How to Wash a Heated Electric Blanket Safely
Unplug, pre-soak, gentle cycle, low heat — a complete guide to laundering your electric blanket without frying the wiring, shrinking the fabric, or voiding your warranty.
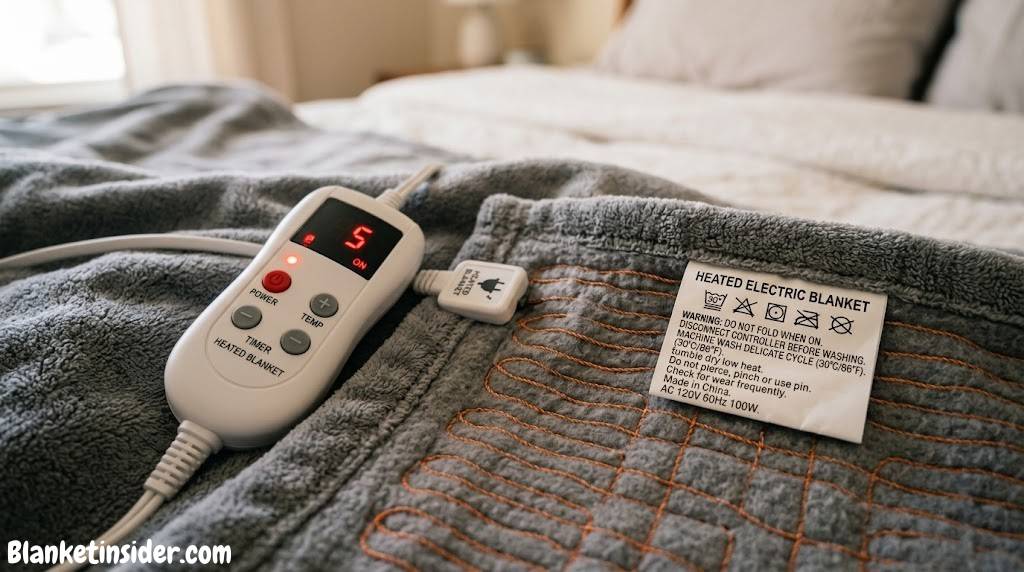
The controller, wiring, and fabric care label are the three things to check before you start. Miss any one of them and you risk damage — or worse.
Electric blankets sit at the intersection of fabric care and electrical safety — and most people treat them like one or the other, not both. Washing incorrectly doesn’t just shorten the blanket’s life; it can damage internal wiring in ways that aren’t visible until the blanket is plugged back in. This guide gives you the exact process, step by step, with the reasoning behind each precaution.
Why Washing an Electric Blanket Is Different from Regular Blanket Care
Most blanket care guides give you a simple formula: check the label, pick the right cycle, avoid bleach. Electric blankets need a different framework entirely. The presence of internal heating wires, controller connectors, and thermal safety sensors means that the standard laundry logic — hot water kills germs, high heat dries faster — becomes a liability rather than an asset.
The heating elements in a modern electric blanket are typically thin, flexible wires woven into the fabric in a fixed serpentine pattern. These wires are insulated with a polymer coating that can crack, harden, or melt under the wrong conditions. Aggressive spin cycles can kink or break the wire at its weakest points — usually near the connector ports or at sharp folds. Hot water can degrade the insulation. Tumble drying on high heat creates both a melting risk and a fire risk if any insulation has already been compromised.
None of this means electric blankets cannot be washed at home. Most modern electric blankets from reputable manufacturers are designed to be machine washable. It means the process must be deliberate, and every shortcut carries a real consequence. For context on the broader world of electric blanket safety and what to look for in a well-designed product, our full electric blanket safety guide covers the risk landscape and the features that separate safe products from dangerous ones.
Including pre-soak, wash cycle, and full air-dry time. Plan around your blanket being out of service for a full day.
The steps are simple. The risk comes from ignoring them, not from any technical complexity.
Front-loader preferred, but a top-loader without agitator works. You need flat or line-drying space for the drying phase.
During active use. Off-season blankets should be washed before storage, not just before first use.
Before You Start: Safety Checks That Cannot Be Skipped
Before the blanket goes near any water, run through this checklist. Each item either protects your safety, protects the blanket, or protects your washing machine from an imbalanced load.
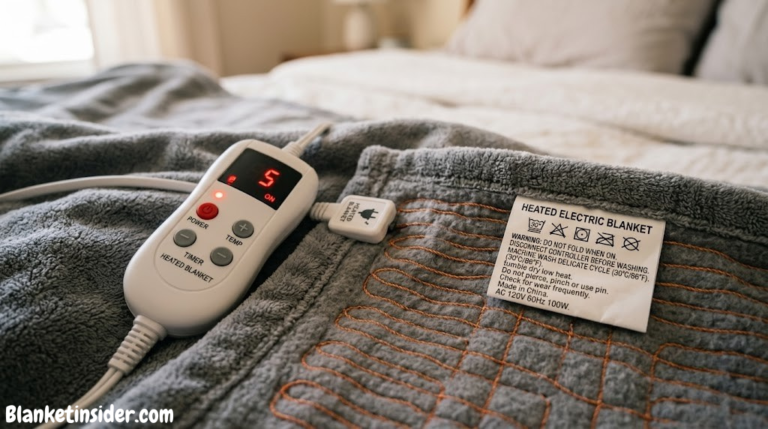
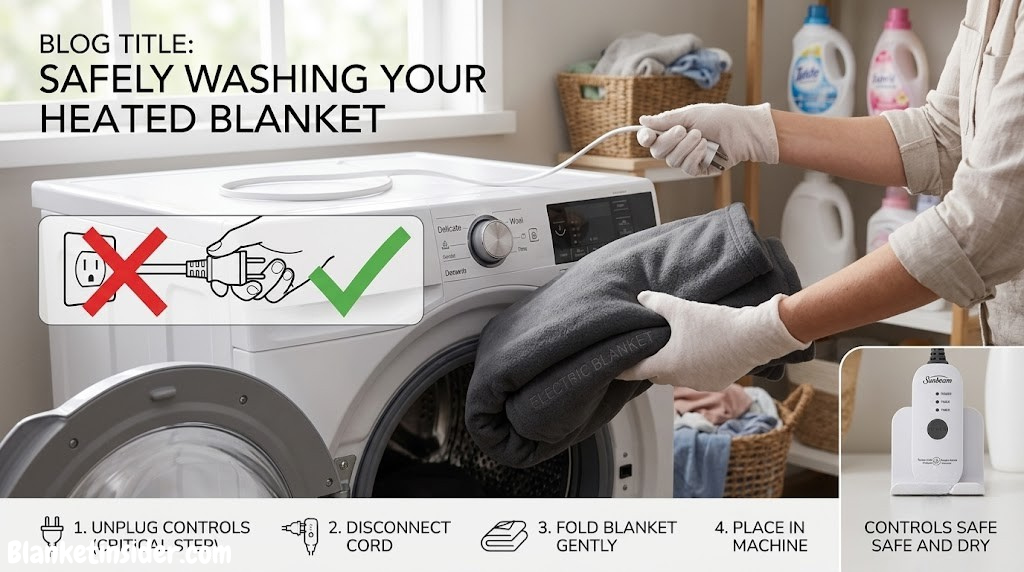
- Controller disconnected? Unplug the controller from both the wall outlet and the blanket connector. Set it aside — it should never go near water.
- Care label readable? Check the sewn-in label before anything else. If a manufacturer says “dry clean only,” that is a non-negotiable.
- No visible wire damage? Run your hands along the blanket surface — gently — feeling for hard lumps, kinks, or exposed wire sections. Do not wash a damaged blanket; repair or replace first.
- Large-capacity washer available? A queen or king electric blanket should go into a machine with at least a 3.5 cubic foot drum. Cramming it into a small machine creates the mechanical stress that damages wires.
- Top-loader with agitator? The central agitator in older top-loading machines is the #1 cause of wire damage in home-washed electric blankets. If your machine has one, use a laundromat’s front-loader or hand-wash instead.
- Connector port covered? If your blanket has exposed connector prongs or ports after removing the controller, tie or pin a small cloth over them before soaking or washing.
- Manufacturer instructions handy? If you have the original manual or can find the model online, confirm wash settings before defaulting to the general guidance in this article.

BlanketInsider pick for washability
Machine-Washable Electric Blanket — Dual Control, Auto Shut-Off, 10 Heat Settings Check Price on Amazon →The Step-by-Step Washing Process
Unplug & Detach — Remove Every Electrical Component
Unplug the electric blanket from the wall outlet. Then locate the controller module — the box or inline unit that attaches to the blanket itself — and disconnect it from the blanket’s connector port. On most blankets, this is a simple twist-and-pull or press-tab connector. Place the controller on a dry surface away from the washing area.
Inspect the connector port on the blanket side. If there is a rubber or plastic protective cap provided with the blanket, attach it now. If not, fold a small piece of dry cloth over the port and secure it with a rubber band or safety pin. This prevents water from entering the connector cavity during washing, which can cause corrosion even after the blanket is thoroughly dried.
Do a quick visual scan of the blanket surface. Look for any area where the wire pattern under the fabric feels hard, lumpy, or kinked differently from the surrounding areas. If you find anything suspicious, photograph it and compare it to a known-good area of the blanket. A wire that has been kinked or damaged will often feel noticeably stiffer than the rest of the blanket.
Read the Care Label — Your Manufacturer Overrides Everything
The sewn-in care label on your electric blanket is the single most authoritative source of washing information for that specific product. Heating wire gauge, insulation material, fabric weave, and connector type all vary between manufacturers and models, and the recommended washing parameters reflect those specifics.
Find the care label — usually sewn into a corner seam, along one long edge, or near the connector port. Look for three things in order: (1) whether machine washing is permitted at all, (2) the maximum water temperature, and (3) any spin-speed restrictions. Many electric blankets permit machine washing on cold water with a gentle or delicate cycle but explicitly prohibit warm or hot water. Some specify a maximum spin speed (often 400–600 RPM) to prevent wire stress.
If the label says “Dry Clean Only,” treat that as a firm instruction, not a cautious suggestion. The wiring configuration in some blankets is genuinely incompatible with home laundering. Our comprehensive guide to washing heated blankets safely covers the specific cases where professional cleaning is the right call and how to find facilities that handle electric textiles.
Pre-Treat Stains — Spot Clean Before the Machine Sees It
If your blanket has visible stains — from body oils, spills, or anything else — treat them before the full wash rather than expecting the machine to handle concentrated staining. Pre-treating is more effective and reduces the need for hot water or additional wash cycles, both of which carry risk for electric blankets.
Apply a small amount of liquid laundry detergent directly to the stained area. Gently work it in with your fingers or a soft-bristled toothbrush, using circular motions from the outside of the stain toward the center. Do not scrub aggressively — scrubbing forces detergent deeper into the fiber, which makes rinsing harder and can leave residue.
Allow the pre-treatment to sit for 5–10 minutes before placing the blanket in the machine or hand-wash tub. Do not use enzyme-based stain removers that require the fabric to be dry — these can leave residue that affects wicking behavior. Avoid any stain product that contains bleach, which can damage both the fabric dye and, in concentrated form, the wire insulation.
Pre-Soak in Cold Water — Loosen Residue Before the Machine Cycle
Pre-soaking is an optional but genuinely useful step for electric blankets that have not been washed in a while, or that have absorbed body oils and sweat over an extended use period. It loosens surface contaminants before the machine cycle, which means you can keep the machine cycle shorter and on a gentler setting while still achieving thorough cleaning.
Fill a bathtub or large sink with cold water. Add a small amount — roughly one tablespoon — of mild liquid detergent. Submerge the blanket fully and gently press it down to ensure even saturation. Do not twist, wring, or bunch the blanket. Let it soak for 15 minutes. Then drain the tub and gently press excess water out of the blanket by pressing it against the tub floor — do not wring.
If you are machine washing, transfer the blanket loosely — not tightly folded — into the machine immediately after the pre-soak. If you intend to hand-wash only, see the dedicated hand-washing section later in this guide.
Machine Wash Settings — Cold, Gentle, Short Cycle
Load the blanket loosely into the washing machine drum. Do not pack it tightly — the fabric needs room to move freely so the water can circulate without putting mechanical stress on the wire junctions. For a queen or king blanket, the machine should ideally be used for this blanket alone, without other items. Smaller blankets (twin, throw) can be washed alone in a medium-capacity machine.
Select the following settings in order of priority:
- Water temperature: Cold — never warm, never hot. Even a single warm wash can begin to degrade the wire insulation in some blankets.
- Cycle: Gentle, Delicate, or Hand-Wash setting — these use slower drum rotation and shorter wash duration, both of which reduce mechanical wire stress.
- Spin speed: Low (400–600 RPM max) — high-speed spinning is the most mechanically damaging phase of the wash cycle for electric blankets. If your machine lets you set RPM independently, keep it at or below the manufacturer’s recommendation.
- Wash duration: As short as available — a 15–20 minute cycle is sufficient for a regularly maintained blanket. Longer cycles add mechanical wear without meaningfully improving cleaning.
Use half the normal amount of mild liquid detergent. Powder detergents can leave residue in the weave around wire pathways. Avoid detergents with built-in fabric softener — the softening agents can coat the fiber surface and, over time, affect the thermal behavior of the blanket’s fabric layer.
Rinse & Spin — Remove All Detergent Residue
After the main wash cycle, run an additional rinse cycle with no detergent. Detergent residue left in an electric blanket does not just affect the feel of the fabric — it can attract moisture between uses, which, in a blanket with internal wiring, raises long-term humidity concerns near the wire connectors and junctions. A second rinse ensures all soap is fully flushed from the fabric.
Keep the spin speed low on this cycle too. The rinse-and-spin cycle can sometimes default to a higher spin speed than the wash cycle — check your machine’s settings. If the default spin is high, manually reduce it or use the same gentle-cycle spin setting.
When the cycle ends, the blanket will be damp — not dripping wet, but still noticeably heavy with retained moisture. This is normal and correct. Do not attempt to wring additional water out by hand. Remove the blanket from the drum carefully, supporting its full weight evenly as you lift it to avoid stretching the fabric or stressing wire connection points under the weight of the water-laden material.
Drying Your Electric Blanket — The Most Critical Phase
Drying is where most electric blanket damage occurs. The heating wire insulation is far more vulnerable to heat during the drying phase than during washing, because tumble dryer heat is concentrated and sustained — unlike the brief heat exposure during an accidental warm wash cycle. The drying method you choose determines both the longevity of the blanket and whether it is safe to use afterward.
Method A: Tumble Dryer (If Label Permits)
If your care label explicitly permits tumble drying, use the lowest heat setting available — often labeled “Air Fluff,” “No Heat,” or “Delicate” on modern machines. Some manufacturers specify a maximum temperature (typically 40°C / 104°F for tumble drying). Do not use the timed “quick dry” or “high heat” settings under any circumstances.
Run the dryer on low heat for 15 minutes. Remove the blanket, gently reshape it to distribute the wire pattern evenly, then return it for another 15-minute cycle. Continue this interrupted process until the blanket is approximately 80% dry. Transfer to a flat or line-drying surface to complete the drying process with air alone.
This interrupted approach — low heat dryer plus air finishing — is more effective than attempting to fully tumble-dry an electric blanket, which requires longer heat exposure and tends to create hot spots as the blanket bunches.
Method B: Flat Air Drying (Recommended for All Blankets)
Lay the blanket flat on a clean dry surface, or drape it over a wide drying rack or clothesline such that the weight is distributed across multiple support points rather than hanging from a single edge. Hanging from a single point stretches the blanket and puts wire tension near the attachment point. A clothesline works well if you drape the blanket over it in a wide S-curve rather than folding it over a single line.
Air-dry in a well-ventilated room or outdoors in shade — not in direct sunlight, which can degrade the fabric dye and cause uneven drying (the sun-facing side dries much faster than the underside, creating moisture gradients that can stress the wire junctions as the fabric contracts unevenly). Allow 3–5 hours for a queen blanket in a normally ventilated room, longer in humid conditions.
The blanket must be completely dry — not slightly damp, but fully dry — before it is plugged in or stored. A damp electric blanket plugged into mains power is a genuine fire and electrocution risk. If in doubt, wait an additional hour. For more on electric blanket safety principles, our electric blanket safety and reviews guide covers the fire and safety statistics that make proper drying so important.
Final Inspection Before Use — Your Last Safety Gate
Before reconnecting the controller and plugging the blanket back in, perform a brief physical and functional inspection. This step takes less than five minutes and is the checkpoint that catches any damage introduced during the washing or drying process.
Lay the fully dry blanket on a flat surface. Run both hands methodically across the entire surface in overlapping passes, feeling for any areas that feel different from before — new lumps, hard spots, or areas where the wire path feels kinked or broken rather than following a smooth serpentine pattern. Pay particular attention to the areas near the connector port and along the edges of the blanket, which are highest-stress zones during both washing and drying.
If the blanket passes the physical inspection, reconnect the controller and plug in to a power outlet. Set the blanket to its lowest heat setting and allow it to run for 5 minutes. Check for any unusual smell (burning, plastic, or chemical odor), any area of the blanket that heats significantly faster or more intensely than surrounding areas, or any visible spark or arc at the connector. Any of these is a reason to immediately unplug and not use the blanket until it has been inspected or replaced.
If the blanket passes both the physical and the low-heat functional test, it is ready for normal use. The most common post-wash issues are caught at this stage — which is why the inspection before first use after washing is not optional. Our guide to washing heated blankets without wiring damage covers what to do if you do find damage after a wash, including how to assess whether a blanket is salvageable.

BlanketInsider laundry pick
Gentle Liquid Detergent for Delicates — No Enzymes, No Softener, Fragrance-Free View on Amazon →Hand-Washing Method: The Safer Alternative for Older or Fragile Blankets
Hand-washing is the recommended method for any electric blanket that is more than a few years old, that has a care label prohibiting machine washing, or that you suspect may have had wiring stress in the past. It is also the right choice if your only available machine has an agitator.
Fill a bathtub with cold water and add one tablespoon of mild liquid detergent. Submerge the blanket fully. Gently knead the blanket with both hands, moving systematically from one end to the other. Work in straight, pressing motions — not circular or twisting — to avoid applying rotational force to the wire junctions.
After 10 minutes of gentle kneading, drain the tub and refill with clean cold water. Repeat the kneading motion to rinse the detergent out. Drain again and repeat the rinse one more time. To remove excess water, lay the blanket flat on large dry towels and gently roll the blanket and towels together, pressing firmly. The towels absorb significant moisture without putting any mechanical stress on the wiring. Unroll, replace the towels with dry ones, and repeat until the blanket is no longer dripping.
Transfer to a flat drying surface or wide-drape clothesline as described in Step 7. Hand-washed electric blankets generally take longer to fully air-dry because they start with more retained moisture than machine-spun blankets — allow 5–7 hours for a queen blanket.
10 Mistakes That Damage Electric Blankets During Washing
The majority of electric blanket failures after washing can be traced to one of the following errors. Most of them involve either heat (too much of it) or mechanical stress (too much of that too).
| # | Mistake | What It Damages | Prevention |
|---|---|---|---|
| 1 | Leaving the controller attached to the blanket during washing | Controller PCB, connector port, moisture ingress | Always disconnect controller before any contact with water |
| 2 | Using hot or warm water | Wire insulation coating, possible shrinkage | Cold water only, always |
| 3 | Using a washing machine with a central agitator | Wire kinking and breakage near junctions | Front-loader or agitator-free top-loader only |
| 4 | High-speed spin cycle | Wire stress, deformation of wire pattern | Low spin (400–600 RPM max) or skip spin |
| 5 | Tumble drying on medium or high heat | Wire insulation melting, fire risk | Air fluff / no-heat setting only, or air dry |
| 6 | Folding the blanket tightly during washing | Wire kinks at fold points | Load loosely, never tightly folded |
| 7 | Using bleach on stains | Fabric dye, possible wire insulation degradation | Mild liquid detergent only for pre-treatment and washing |
| 8 | Plugging in before fully dry | Short circuit, electrocution risk, fire risk | Full air-dry (test with hand before plugging in) |
| 9 | Washing in a machine that is too small | Wire stress from overcrowding, mechanical damage | Large-capacity machine (≥3.5 cu ft) for queen/king |
| 10 | Skipping post-wash inspection | Undetected damage used under normal heat load | Always do a 5-minute low-heat inspection test |
Storing Your Electric Blanket After Washing
If you are washing your electric blanket at the end of the heating season before storing it for several months, the storage method matters as much as the washing method for long-term wire integrity.
Never fold an electric blanket into tight, sharp creases for storage. The wire insulation hardens slightly over time, and repeatedly folding along the same crease lines creates stress fractures that are not visible until the blanket is used and the wire flexes. The ideal storage approach is to roll the blanket loosely around a large cardboard tube (similar to a poster tube, but larger), which keeps the wire in a consistent gentle curve rather than a sharp fold. If a tube is not available, fold the blanket into large, loose panels — with different fold lines each time — before placing in a storage bag.
Store in a breathable fabric bag or cotton pillowcase rather than a sealed plastic bag or container. Plastic traps residual moisture that can slowly degrade the wire insulation over a storage period. Our guide to the best blanket storage bags covers breathable options that work well for electric blankets, and the overview of blanket chests and storage trunks is useful if you need a more permanent storage solution.
Always disconnect and store the controller separately from the blanket in the same breathable bag. Never wrap the power cord tightly around the controller — this strains the cord at both ends and can cause the insulation to crack at the coil points.

Storage pick
Breathable Blanket Storage Bag — Cedar-Lined, Moisture-Resistant, King Size Shop on Amazon →How Often Should You Wash an Electric Blanket?
The conventional wisdom for blankets used directly against skin is every two weeks during active use. For electric blankets, that guideline holds but warrants a small adjustment based on usage pattern:
| Usage Pattern | Recommended Wash Frequency | Notes |
|---|---|---|
| Nightly use directly on skin | Every 2 weeks | Body oils and sweat accumulate quickly; more frequent is better |
| Nightly use over a duvet or sheet layer | Every 4–6 weeks | The layer between skin and blanket reduces direct contamination |
| Occasional guest-room use | After each guest use, plus before storage | Unknown use patterns from guests; wash before and after each stay |
| Seasonal use (winter only) | Monthly during use + before storage | Always wash before off-season storage; do not store unwashed |
| Pet contact (dog or cat on blanket) | Weekly | Pet dander, oils, and occasional accidents require higher frequency |
One common question is whether washing an electric blanket frequently shortens its life significantly. The honest answer is: yes, somewhat — each wash cycle introduces some mechanical wear. The tradeoff is hygiene and the maintenance of the fabric’s thermal performance. A blanket that is regularly washed according to the guidelines in this article will outlast an unwashed blanket, because accumulated oils and debris degrade both the fiber and the wire insulation over time.
For related guidance on washing schedules for other specialty blankets, the approaches in our guide to washing weighted blankets share some structural similarities — both types of blankets involve embedded materials that require modified washing protocols.

Time for a replacement?
Top-Rated Electric Blanket — Machine Washable, Dual Zone, 5-Year Warranty Find the Best Deals →Frequently Asked Questions
-
Can you put an electric blanket in the washing machine?
Yes, most modern electric blankets are designed to be machine washable. The key conditions are: the controller must be disconnected first, the water must be cold, the cycle must be gentle, and the spin speed must be low. Always verify with your specific blanket’s care label before machine washing, as a small number of models are dry-clean-only.
-
What happens if you wash an electric blanket with the cord in?
Water can enter the controller housing and damage the internal circuitry, corrode the connector pins, and create a short circuit risk when the blanket is next plugged in. In worst cases, a damp controller connected to mains power can cause an electrical fault or fire. Always remove the controller before any washing or soaking.
-
Can you tumble dry an electric blanket?
Only if the care label explicitly permits it. If tumble drying is permitted, use the lowest heat setting (air fluff or no-heat), run in 15-minute bursts, and finish with flat air drying. Never tumble dry on medium or high heat — the sustained heat can melt wire insulation and create a fire risk. When in doubt, air dry only.
-
How do you know when an electric blanket is fully dry?
Press your palm firmly against the blanket surface in several locations, including the thickest areas. If any area feels cool relative to room temperature, it still contains moisture. A fully dry blanket will feel uniformly at room temperature throughout. When in doubt, wait an additional hour before plugging in. Never test by turning the blanket on — the inspection protocol in Step 8 is the safe way to verify dryness under power.
-
Can you hand wash an electric blanket?
Yes, and for older blankets or blankets that have shown any signs of wiring stress, hand washing is actually preferable to machine washing. Use cold water, mild liquid detergent, gentle kneading (no twisting or wringing), and multiple rinse passes. Remove excess water by rolling in dry towels rather than squeezing or wringing.
-
Is it safe to use an electric blanket that has been washed?
Yes, provided it has been washed correctly and is completely dry before use. The post-wash inspection protocol — physical surface check plus 5-minute low-heat functional test — is the confirmation step. Any unusual smell, uneven heating, or sparking during the test is reason to retire the blanket. A correctly washed and fully dried electric blanket is as safe as it was before washing.
-
Why does my electric blanket smell after washing?
A mild detergent smell immediately after washing is normal and will dissipate. A burning or plastic smell during or after use suggests wire insulation damage — unplug immediately and do not use the blanket. A musty smell indicates the blanket was stored or used before fully drying. Air the blanket for several hours in good ventilation before the next use.
-
How often should you replace an electric blanket?
Most manufacturers recommend replacing electric blankets every 5–10 years, regardless of apparent condition, because wire insulation degrades over time even without visible damage. A blanket that is regularly washed and inspected can safely reach the upper end of that range. Any blanket showing fraying, exposed wire, scorching, or inconsistent heating should be replaced immediately regardless of age.
-
Can you spot clean an electric blanket instead of washing it?
Yes, for minor spills or small stains between full washes. Use a damp cloth with a small amount of mild detergent, applied with gentle dabbing motion. Do not soak the area — keep moisture minimal. Allow the spot to air dry completely before using the blanket under power. Spot cleaning is not a substitute for periodic full washing, which removes the built-up body oils and perspiration that spot cleaning cannot address.
-
What type of detergent is best for electric blankets?
A mild liquid detergent with no added enzymes, no fabric softener, and no bleaching agents is the safest choice. Fragrance-free formulas are preferable because fragrance compounds can linger in the fabric near heated wire paths. Powdered detergents are not recommended because they can leave granular residue in the weave, particularly in areas where the wire creates ridges in the fabric surface.
-
Can electric blankets catch fire if washed incorrectly?
The combination of damaged wire insulation (from incorrect washing) and the blanket being plugged in creates conditions that can lead to an electrical fault and potentially a fire. The risk is not from the washing itself but from using a blanket that has been damaged by incorrect washing under power. This is why the post-wash inspection protocol exists — to catch damage before it can manifest as a safety event during use.
-
Do electric blankets lose heat after washing?
A correctly washed electric blanket should not lose any heating performance. The heat is generated by the wire, which is not affected by cold-water washing on a gentle cycle. If you notice reduced heat output after washing, the most likely causes are: a partially damaged wire (from washing) that is not conducting evenly, a controller that was exposed to moisture, or a thermostat sensor that has been displaced from its intended position in the fabric. Any of these warrants a detailed inspection.
Ready to Shop or Replace?
Browse our tested picks for electric blankets and washing supplies — all affiliate links support BlanketInsider at no extra cost to you.
As an Amazon Associate, BlanketInsider earns from qualifying purchases. This does not affect our editorial recommendations. Always follow your specific blanket manufacturer’s care instructions.